
Change ListA list of changes made to this document.
IntroductionThis tutorial demonstrates a method for creating aircraft liveries. It assumes the reader has a basic knowledge of the following software:
After reading this tutorial, the reader should be able to create detailed liveries with complex paint schemes. To demonstrate the best methods for creating these liveries, two examples have been used, the Vans RV-7A and the Piper PA-18. Please see the References and Useful Links section for help getting familiarised with the software used in this tutorial. Exporting from 3DS Max
The first step of the process is to export a model from 3DS Max. Select the highest level in the LOD tree with "Select Children" enabled. In this case, it's "RV7_LOD_400." Go to File → Export Selected and choose .FBX. Exporting in this format will ensure all materials come through to Substance Painter. If the aircraft includes animations, some strange artefacts may be created upon import. In order to minimise this, animation keyframes should be deleted and the “Animation” checkbox should be unchecked on export. Please note: once materials are set-up in Substance Painter, they cannot be renamed in 3DS Max and reloaded using the Project configuration → Mesh change feature.   Using Substance Painter
Substance Painter is a very powerful texturing program, featuring a 3D painting engine and tools for creating decals, precise graphical shapes, and textures. It allows the user to preview and manipulate graphics in 3D rather than pushing around pixels in a 2D texture. Launch Substance Painter and create a new project. Import the mesh and select the *PBR-spec-gloss* template. Once the mesh is in Substance Painter, the livery can be blocked-out in rough. The purpose of using Substance Painter for livery creation is to get a good idea of what the final result will look like by apply shapes, lines and decals in 3D space. The block-out doesn't have to be perfect; once it's complete, Illustrator® will be used to create the precise curvature. PA18 ExampleHere is an example using the PA-18 with some very basic lines. This setup utilises a fill colour and a mask. Using Lazy Mouse, located in the top toolbar, will decrease high-frequency mouse/tablet movement and produce a more consistent result. Another useful tool is Polygon Fill, which is good for filling large areas by using the mesh’s vertices, faces, topological continuity, or UV islands.   Substance Painter TechniquesThis is a more in depth breakdown of the various techniques used to create a new livery for the RV7. A fill layer can be created in the layers tab. This is done by right-clicking and selecting Add Fill. Masks in Substance Painter work similarly to in Photoshop®. The advantage to using masks is that colour can be easily changed at any time. In order to quickly paint the top of the aircraft, the Polygon Fill tool is selected (Hotkey 4), face mode is chosen, and polygons are drag selected. The X key can be used to switch between black and white colour on the brush. Another really useful feature is the symmetry tool, located in the top toolbar. This displays a transparent red plane down the centre of the aircraft and will determine which axis the changes are reflected across. Even though this approach has been effective for quickly painting the top portion of fuselage, a horrible, wonky line has been left along the centre of the plane. This can be amended in a number of different ways using Photoshop® or Illustrator®. However, because it needs to be perfectly straight, it makes sense to keep everything in Substance Painter at this point. The Default Hard brush is selected from the Brushes pallet and a line is scored down the centre using a new layer with an identical colour. A good way to draw a straight line is to click on a particular point, hold CTRL+SHIFT and choose its end point. Holding just CTRL will alter the line's angle.
The next step is to create the checked pattern, running along the gap between the two lines. The layer setup for this is a little more complex. Firstly, a standard grey fill is created, a black mask is added, and an additional fill is applied on top of that (this can be done by right-clicking on it). A procedural checker pattern is then added to the fill and sliders are adjusted such that they scale correctly. Again, because this is procedural, it can be adjusted at any time. On top of this, another fill is added with a shape gradient to create a fade effect towards the tail of the aircraft. Finally all the fill layers are moved into a masked folder, which only exposes the area between the lines.
Another image of how the checkered pattern layer is formatted. This final image shows the completed draft for the desired livery. The same process is used for areas such as the wing tips and tail. The green line is drawn using the same technique in the Piper example, utilising Lazy Mouse to get as much fluidity as possible in the lines curvature. Once the design is blocked-out, the textures can be exported into a folder as using 4096px x 4096px for image dimensions. Below, are the settings used for the RV-7. Configuring Texture Maps in Illustrator®For the next step, Photoshop® and/or Illustrator® are used to get the desired effect. Both have been used in this example. The Substance file can be imported as a smart object and assigned to its own layer. There will now be a live link between the two programs so if something needs to be added or changed in Substance Painter, it will instantly update when exported. This same process can be done to link the .AI file in Photoshop® and Marmoset. 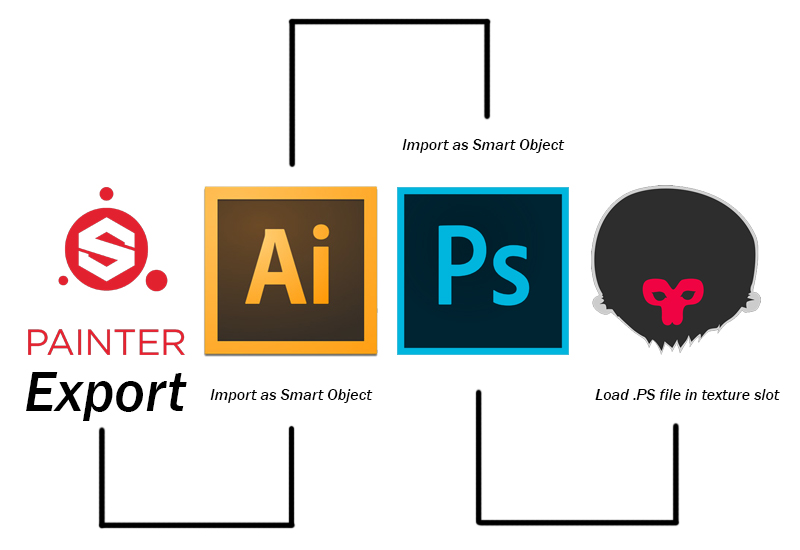  Above, is an image of the layers used in Illustrator®. Creating Vectors in Illustrator®This Substance export will now act as a guide for creating the crisp vector lines we use in the end result. The opacity of the image was decreased and vector paths were created on a new layer with the pen tool. The RV-7 doesn't require a huge amount of vector work because the design is quite simple. More work is required with the PA-18 as it has a more complex paint scheme.
Importing Into Marmoset ToolbagImport the .FBX (the one originally exported for Substance Painter) into a real-time graphics engine such as Marmoset Toolbag and load the Photoshop® file into the relevant texture slot (typically Albedo). When the Photoshop® file is saved, it will automatically update in the Marmoset scene. Alternatively, the Photoshop® file can be exported as a regular .dds file and used directly in a FSW aircraft's texture folder. This is slower due to the added export process so use of Marmoset Toolbag is preferable. Making Final ChangesTweak the Illustrator®/ Photoshop® file until a final result is reached. Refer to the Application section of the Physically-Based Rendering document to help generate the FSW-ready .dds textures. Generally, if it's just a livery being created, only an Albedo map is necessary. If, however, the livery has some special characteristics, such as unusual paint properties, a Combined map may also be desirable. Advanced Paint Schemes for LiveriesUse Illustrator® to create a complex decal to afterwards use in Substance Painter. Some liveries may require a slightly different workflow depending on the complexity of the design. This workflow begins in Illustrator® working with a 4K document. A reference image is used on a transparent layer and vector paths are placed down as we did in the Creating Vectors in Illustrator® section. The outlines were given a fill to create solid decals, exported from Illustrator®, and then loaded into Substance Painter as a transparent alpha. The exported file needs to be a power of 2 (e.g. 1024x1024 or 2048x2048). It's also helpful to save it with transparency. The easiest way to import is to drag and drop the file from the explorer into the Shelf. The location of the file within our project can then be specified. There are two ways to stamp the decal onto the aircraft. Both use the same practice as before: a fill layer and mask. 1. Using a brush
2. Using a stencil With the stencil, the decal you load into Substance Painter needs to be black and white, ideally not containing any transparent background.
See Substance Painter Beta 10: Using Stencil Masks for more information on using this method. References and Useful Links
|
Art Authoring > Workflow Tutorials >


