Have you ever dreamed of making your own flight missions, such as an adventure in the Australian outback or trying to land an aircraft in Alaska during poor weather? Perhaps you’ve always wanted to make a search and rescue mission, or maybe you just want to create a flight to and from your favorite airports and want to share this with your friends.
Welcome to the Dovetail Pro Mission Tool. This application allows you to create and edit your own flight missions for use with Flight Sim World.
The Pro Mission Tool is a fully featured editor that is used by the Flight Team Mission Designers to create content for Flight Sim World. The tool is extremely powerful and has many features, but this means it can be slightly overwhelming for new users. We will take you, through the process of creating a mission. We will explain various features, so that you can quickly begin to create your own exciting flying adventures. Installing the Pro Mission ToolTo install the Pro Mission Tool you will need to log into your Steam account, once you have done that, click on the Library option and then Tools. Scrolls down the list of tools until you find Flight Sim World: Pro Mission Tool. Figure 1.1. The Tools option in Steam.
Right click on the Flight Sim World: Pro Mission Tool text and click on Install Game. Steam will ask you which folder to use to install the application. If you are happy with the default path click on Next, or change the path before proceeding. You will now need to accept the End User License Agreement. If you agree click on I AGREE to continue.
The editor will now begin to install on your PC. Click Finish to close the dialog box and wait for the tool to complete installing. You will know once it’s complete as it will say Ready to Play in the Status field. Starting the EditorOnce you have installed the editor, you will need to launch it from Steam. Double left click on the Flight Sim World: Pro Mission Tool to launch the application, or alternatively right click on it and select Play. If you have elected to have an icon added to the desktop you can also double click on this to run the application. Figure 1.2. The Dovetail Pro Mission Tool Icon.
You may be asked permission by Windows User Access Control to run the application. If so, click on Yes.
| Note: The Pro Mission Tool will take a few minutes to load the first time it’s run. It may ask you to refresh its data, If it does click on Yes |
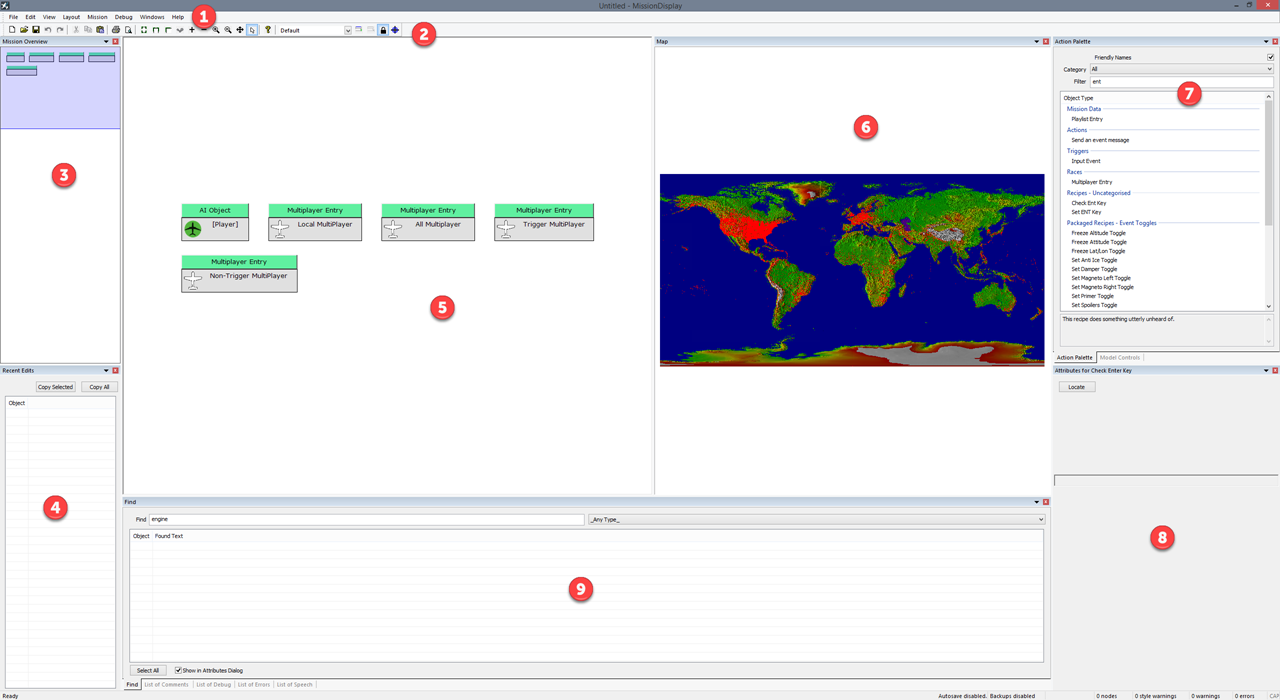
Tour of the EditorOnce the Pro Mission Tool has loaded you will get a screen that is similar to Figure 1.3, this is the editor. There are quite a few options available, but the screen can be broken down as follows: - Text menu
- Button Menu
- Mission Overview
- Recent Edits
- Event Viewer
- Map Editor
- Action Palette
- Attributes/Properties Bar
- Debug/Informational Bar
Figure 1.3. The Dovetail Pro Mission Tool.
 | Note: Your screen may not look exactly as that shown in Figure 1.3, as the editor items can be moved around to create a more personalized editor. |
| Note: Some editor windows are multi-function which means they may have multiple tabs for completing various tasks. |
Text MenuThe text menu is a quick access menu as shown in Figure 1.4. This means you can access various options from the relevant text menu categories. For example, items to do with loading and saving can be found in the “File” menu option, while the ability to show or hide various editor windows can be found under the “Windows” menu option.
Figure 1.4. The Text Menu. Button MenuThe button menu provides a number of editor features via icons (buttons). Some of the icons in the button menu are things that you’ll do regularly such as saving the mission, while others are useful for a particular editor window. You can see the default starting icons for the Pro Mission Tool in Figure 1.5.
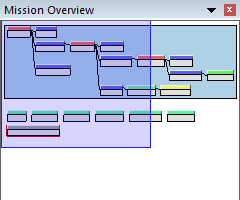
Figure 1.5. The Button Menu. Mission OverviewThis will show a high level view of your current mission as a set of boxes and you can jump to a particular area of the code by left clicking the mouse. You can see an example mission loaded into the editor in Figure 1.6.
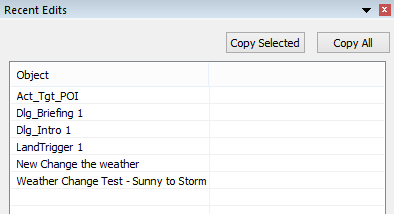
Figure 1.6. The Mission Overview dialogue box with a mission loaded. Recent EditsWhen you make any changes to the data within the Pro Mission Tool it will list those changes within the Recent Edits dialogue box. In many cases you may make a change to the data, test it and then decide to make another change. The recent edits dialog box allows you to track the nodes that you have been changing, by double clicking on it, it will take you back to that node. See Figure 1.7 for an example of nodes that have recently been changed.
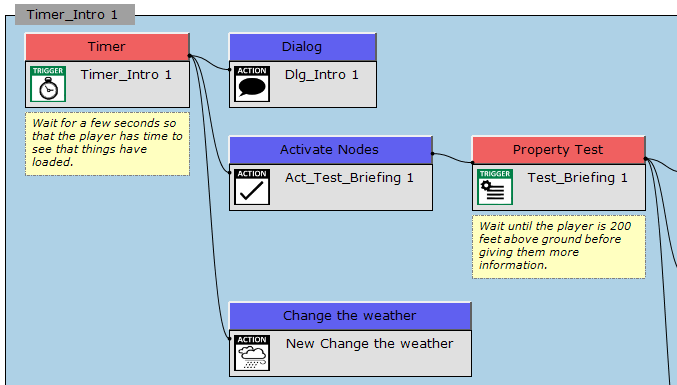
Figure 1.7. The Recent Edits dialogue box. Event ViewerThe Event Viewer is the core component of the Pro Mission Tool. This is where all of the mission’s logic is generated. You can see an example of this logic in Figure 1.8. The event viewer contains nodes (the boxes) which are connected together to create the mission.
Figure 1.8 An example of the Event viewer with some logic code.
| Note: Not all nodes can connect to each other.
|
| Note: Your nodes may have more information within them, they can be configured to show their properties or in the case of Figure 1.8 you can go for a more simplified view. |
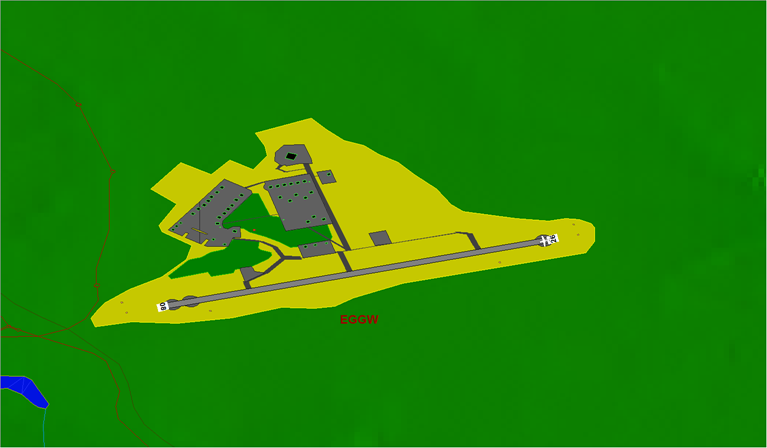
Map EditorThe Map Editor is a key component of the Pro Mission Tool as it allows you to place mission objects onto the map directly, allowing you to quickly build your mission structure before you start to create the logic. Using the Map Editor is a great way of visualizing a simple mission layout and can be used as an initial way to design your mission before starting to fine tune it by playing the game.
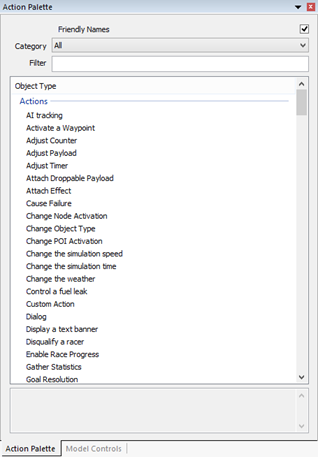
Figure 1.9. The Map Editor. Action PaletteThe Action Palette is where all of the games logic nodes are stored. These are categorized into a number of object types and you can also filter them by typing in the name of the node that you need. All objects create a logic box within the event editor and some will create a graphic icon within the map. You can see an example of the Action Palette in Figure 1.10, when the actions category is selected.
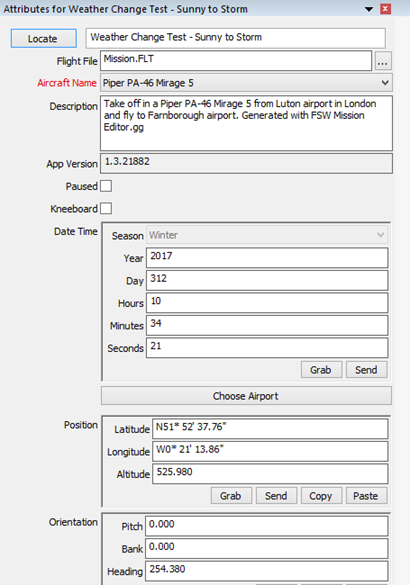
Figure 1.10 The Action Palette. Attributes/Properties DialogueThe Attributes/Properties Dialogue box displays properties for any nodes within the Event Viewer. Here you can change individual item values such as display text and variables such as date, timer numbers etc. You can see an example of an Attributes dialogue for the flight file for the mission Voice of Reason in Figure 1.11.
Figure 1.11. The Attributes Dialogue box.
|
|